A Flight of Snow Cones


For a simple summer treat, nothing beats a snow cone.   


Lindsay Laricks, of Fresher than Fresh Snow Cones, is a graphic designer from 9 to 5. But on the weekends, she pulls her vintage Shasta trailer 


to spots around town and serves up summer’s best refresher—gourmet snow cones.


These aren't day-glo syrups made from artificial ingredients, but homemade concotions with garden flavors : Ginger Rose, Blackberry Lavender, Watermelon Basil, and Green Tea Pear. 


You can order a flight of mini-snow cones, served in small paper containers, or a big one all to yourself. If you’re not fortunate enough to live in the Kansas City area, you can still make a trio of snow cones at home for a fun dessert that will beat the heat.


A Trio of Snow Cones
You can make these syrups up to 1 week ahead and keep them in the refrigerator.  You'll have a rosy pink, a pale green, and dark purple trio of icy goodness.
Serves 4
1/2 cup Rosy Rhubarb Syrup (below) 
1/2 cup Fresh Herb Syrup (below)
1/2 cup Blackberry Lavender Syrup (below)
4 cups chopped or shaved ice (in the food processor or with an attachment to a stand mixer)
1. Mound 1/3 cup of shaved ice in each of 12 small glass bowls or ramekins. Drizzle 2 tablespoons of Rosy Rhubarb Syrup over each of 4 bowls; 2 tablespoons of Fresh Herb Syrup over each of another 4 bowls; and 2 tablespoons of Blackbery Lavender Syrup over each of the last 4 bowls. 


Rosy Rhubarb Syrup
4 cups chopped rhubarb, fresh or frozen and thawed
1 cup water
2 cups sugar
The juice of 2 lemons
1. For the syrup, place the rhubarb and water in a saucepan over medium-high heat and bring to a boil. 


Reduce the heat to medium-low, cover, and cook the rhubarb until tender and pulpy, about 10 minutes.  Strain off the rhubarb pulp, reserving the juice. Measure the juice and add enough water to equal 2 cups. Return the liquid to the saucepan over medium-high heat and stir in the sugar. Bring to a boil so the sugar dissolves, about 8 minutes. Remove from the heat, stir in the lemon juice, and let cool. 


Fresh Herb Syrup
1 cup sugar
3/4 cup water
1/2 cup fresh, aromatic herb leaves, packed, coarsely chopped

1.  In a large, microwave-safe glass measuring cup, combine the sugar, water, and herbs. Microwave on high until the sugar dissolves, about 3 to 4 minutes. Let the mixture steep for 20 to 30 minutes. Then, strain the mixture into a bowl and let cool.  Use right away or store in a covered glass jar in the refrigerator for up to 2 weeks.


Blackberry Lavender Syrup
A few dried lavender buds from your garden or a health food store (or culinary lavender from Penzey's) add depth and interest to this easy-to-make syrup. The lavender makes dark berries taste "berry-er." Adapted from Heartland: The Cookbook
Makes about 1 1/2 cups
1 cup sugar

3/4 cup water

1 teaspoon dried lavender buds

1 cup blackberry jam
Fresh lemon juice
1.  In a large, microwave-safe glass measuring cup, combine the sugar, water, and lavender. Microwave on high until the sugar dissolves, about 3 to 4 minutes. Whisk in the blackberry jam. Let the mixture steep for 20 to 30 minutes. Season to taste with lemon juice, strain the mixture into a bowl, and let cool.  Use right away or store in a covered glass jar in the refrigerator for up to 2 weeks. 


Fresh Sweet Corn


All Ears
The climate of the Midwest is ideal for growing corn, which needs hot, humid summers and rich bottomland soil to be “knee high by the Fourth of July” and then ripen to sugary goodness. When it’s in season, people go nuts for it.
            Festivals like the Sweet Corn Festival in Sun Prairie, Wisconsin, celebrate this delicacy every third week in August since 1953. Sure, there are the fire engine rides, a parade, a craft fair, and bingo.  But generations of sweet corn lovers—from grandparents to the newest grandchild--grab the salt shakers suspended by strings from a clothesline and gobble down ear after ear, right out of the pot.
Traditional sweet corn varieties like Silver Queen, Peaches and Cream, or Purdue Super Sweet barely make it in from the field before folks boil or grill it and eat right away. Our collective love of sweet corn is also reflected in the names of new varieties:  Temptation, Charm, Revelation, Sugar Pearl, Obsession, Passion, Gotta Have It, and Sweet Perfection. Who can resist?

“Sweet corn was so delicious, what could have produced it except sex? . . . 
People have wanted sex to be as good as sweet corn and have worked hard to improve it, and afterward they lay together in the dark and said. . . “That was so wonderful. . . . But it wasn’t as good as fresh sweet corn.” 
Garrison Keillor


Pan-Roasted Chicken Breasts with Tarragon Creamed Corn
Free range, organic chicken—a heritage breed, if you can find it—fresh sweet corn, and garden-grown tarragon provide the flavors in this new take on a farmhouse classic. A large, cast iron skillet, which can go from stovetop to oven, gives the crispest, most flavorful result. Cover the skillet with a lid or a sheet of aluminum foil to keep from making a big mess in your oven. Serve with a crisp, green salad and Farmhouse Yeast Rolls (adapted from Heartland: The Cookbook).
Varieties to try:  Heirloom Country Gentleman, Silver Queen, heirloom Boone County White, Butter and Sugar, or Peaches and Cream.
Serves 4
2 tablespoons Home Rendered Lard (page 000) or canola oil
4 bone-in, skin-on chicken breasts
Kosher salt and freshly ground black pepper
1/2 cup dry white wine
1 tablespoon fresh lemon juice
Tarragon Creamed Corn:
4 cups fresh or frozen sweet corn kernels
½ cup chopped green onions with some of the green
1 cup heavy cream
1 tablespoon tarragon vinegar
1 tablespoon fresh tarragon leaves
Kosher salt and freshly ground black pepper
Fresh tarragon sprigs to garnish
1. Preheat the oven to 475 °F. On the stovetop, heat a large cast iron skillet over high heat. While the pan heats up (this can take about 15 to 20 minutes), make sure the chicken is patted as dry as possible. Brush the skin side of the chicken breasts with the soft lard or oil. When the pan is smoking hot, carefully place the chicken, skin side down, and cover carefully with a lid of a sheet of aluminum foil. With heavy-duty oven mitts on, transfer the covered skillet to the oven. Roast for 10 minutes.
2. Carefully remove the hot pan from the oven and turn the chicken breasts. The skin should be beautifully golden and crisp. Generously season the skin side with salt and pepper. Cover and return the pan to the oven. Roast another 20 to 25 minutes or until an instant read thermometer inserted in the thickest part of a breast registers 160 degrees.
3. Meanwhile, make the creamed corn. In a nonstick skillet over medium heat, stir the corn, green onion, tarragon, and cream together. Cook, stirring occasionally, until the corn is tender, about 5 minutes for fresh corn, 10 to 12 minutes for frozen.  Stir in the vinegar and cook for 2 more minutes. Season to taste and keep warm.
4. Remove the chicken from oven, transfer to a plate, and tent with aluminum foil to keep warm. Over medium-high heat, whisk the white wine into the pan drippings and let reduce by half, about 2 minutes. Stir in the lemon juice, then season to taste.  To serve, place a chicken breast on each plate and nap with the pan jus. Spoon the creamed corn onto the plate, garnish with tarragon sprigs, and serve.

Garden to Grill, Pizza to Plate


Pizza doesn't have to be loaded down with cheese and meat to be delicious.  


When you grill pizza, you get still that deep caramelized flavor of the grill.  Then, when you top that pizza with a drizzle of olive oil, some fresh veggies from your garden, and a sprinkle of aged cheese, you get big flavor.


Last week's blog post featured an easy stir-together dough.


This week's blog post is how to use this dough--and whatever toppings you like--to make 4 individual pizzas.  


Take a fourth of that dough and form it into a 6- to 8-inch circle.  


To help keep the round shape, use this method: Line a baking sheet with parchment paper. Brush olive oil in a circle that's a little large than your pizza, then place your pizza on the oiled circle. Brush the top of the pizza with olive oil.


Take it out to the grill that is at a medium-hot temperature.


Here's a video to show you how to flip that dough onto the grill grates.


If you press on the dough when you are removing the parchment paper, the underside of the pizza will get little ridges, sort of like a waffle.  This helps any sauce or toppings hold to the pizza better. But if you don't like ridges, don't press on the parchment paper or flip the pizza over to use the other side as the "trophy" side.


When one side of the pizza has good grill marks and is easy to turn, turn it over with grill tongs and drizzle the up-side with olive oil.  Add an assortment of fresh or grilled veggies, cut into small pieces, about 2 cups total. Here, you see, clockwise, zucchini, fresh corn, carrot shreds and roasted red peppers, blackened green beans, chopped shallots, cherry tomatoes, and yellow summer squash:


Add a little grated white Cheddar, provolone, or Parmesan if you like. Move the pizza to a cooler spot on the grill and close the lid for 2 to 3 minutes or until the veggies have softened and the cheese has melted.


Here's a second video to show you both grilled pizza and flatbread. 


If you're not quite hungry yet, then maybe gazing at the cover of
The Gardener and the Grill might do it!


Fresh Herb Flatbreads on the Grill


Sometimes it's the simplest things that taste the best.


Take these flatbreads, for example.  Made from a stir-together dough, patted into rustic ovals, then sizzled on the grill, they make that wrapped loaf of garlic bread seem so 1960. And not in a good way.


Rustic  flatbreads can be topped with anything after they take their turn on the grill.  Here, I drizzled the flatbread with extra virgin olive oil, crumbled on some fresh goat cheese, sprinkled with fresh herbs and accompanied it with just-ripe tomatoes from my garden and a few cured olives. Perfect.


Serve a pile of them with hummus, olives, cherry tomatoes, and cucumber for an easy meze. 


Add a tomato and basil mixture for a do-it-yourself bruschetta. 


After all, it's summer and the livin' should be easy. 

Stir-Together Flatbread and Pizza Dough
Using instant or bread machine yeast, which doesn’t have to be proofed in water first, is the key to this easy, no-knead dough. 


I'm also using Hudson Cream bread flour, one of my favorites because it's regional, I've been out there to see flour milled right after the wheat harvest, and it's wonderful flour. In Kansas City, we can get Hudson Cream Flours at the grocery store, but they also do mail order.

http://www.hudsoncream.com/ 


It’s great for pizzas or flatbreads on the grill. Allow 1 hour for rising time. 

Adapted from The Gardener and the Grill by Karen Adler and Judith Fertig

Makes 1 pound dough for 4 individual pizzas or flatbreads

2 cups bread or all-purpose flour         
1 1/4 teaspoons salt         
2 teaspoons instant or bread machine yeast
1 cup lukewarm water     
1 teaspoon honey
1 tablespoon olive oil

In a medium bowl, stir the flour, salt and yeast together. 


Combine the water, honey and olive oil 


pour

and stir into the flour mixture. I like to use a Danish dough whisk, but a mixing spoon or a fork also work well.


Cover the bowl with plastic wrap and let sit at room temperature (72°F)


 until doubled in size, about 1 hour.  


Cover and refrigerate for up to 3 days before baking.

How to Grill Flatbreads and Pizzas
Use either homemade Stir-Together Flatbread and Pizza Dough or 1 pound of prepared pizza or bread dough. Transfer the dough to a floured surface and divide into fourths. Flour a rolling pin or your hands and roll or pat each portion of dough into an oval. Brush a baking sheet with olive oil and lay each oval on the prepared sheet.


To grill as plain flatbread, prepare a medium-hot fire in your grill. Brush the top side of each dough oval with olive oil. Grill over direct medium-high heat until you see the dough starting to bubble like a pancake, about 2 to 3 minutes, and the bottoms have good grill marks. 


Turn, quickly brush with more oil, and grill for 1 more minute or until the other side has good grill marks. Serve hot.

To grill as flatbreads or pizzas with toppings, prepare an indirect fire in your grill (page 000). Brush the top side of each dough oval with olive oil. Grill over direct heat until you see the dough starting to bubble like a pancake, about 2 to 3 minutes, and the bottoms have good grill marks.  


Brush the top side with olive oil and flip the pizza, using tongs, onto a baking sheet. Quickly spoon the topping of your choice. Using a grill spatula, place it on the indirect or no-heat side of the fire. Cover and grill for 5 minutes or until the topping is bubbly.

Bistro-Style Chicken on the Grill


Sometimes the seemingly simplest things to grill can be the most difficult. Take the boneless, skinless chicken breast, for example. 


Julia Child popularized this cut during the late 1960s and early 1970s on her groundbreaking PBS cooking program The French Chef. In those days, you had to bone and skin the chicken breast yourself. Now you can pick up a package of boneless, skinless breasts in any grocery store.


When you look at a chicken breast, you’ll see that it’s very thin at the ends and thick in the middle. 


How do you grill it so that every part stays tender and juicy? 
By turning it into a paillard, a French term for a boneless piece of meat that has been flattened to an equal thickness. 


The easiest way I’ve found to do this with chicken is to first turn the chicken breast on its side 


and cut it in half lengthwise.


Then, place each piece between plastic wrap or sheets of parchment paper. Use the flat side of a metal meat tenderizer or a meat mallet. Simply pound the chicken breast, starting in the middle and working your way out to the sides, until the chicken is of an even 1/4- to 1/2-inch thickness. This technique—and this recipe--also works for veal or pork loin paillards (also known as scallops, or scaloppine in Italian).


On a hot grill outside or in a grill pan over high heat (allow at least 20 minutes for the grill pan to heat up), a chicken or veal paillard will take a total cooking time of 10 minutes per inch of thickness. 
Grill a 1/2-inch-thick paillard for 2 1/2 minutes per side, or 5 minutes total. A one-quarter-inch paillard will take only about 1 1/4 minutes per side, so it makes sense to serve it with equally fast side dishes. 


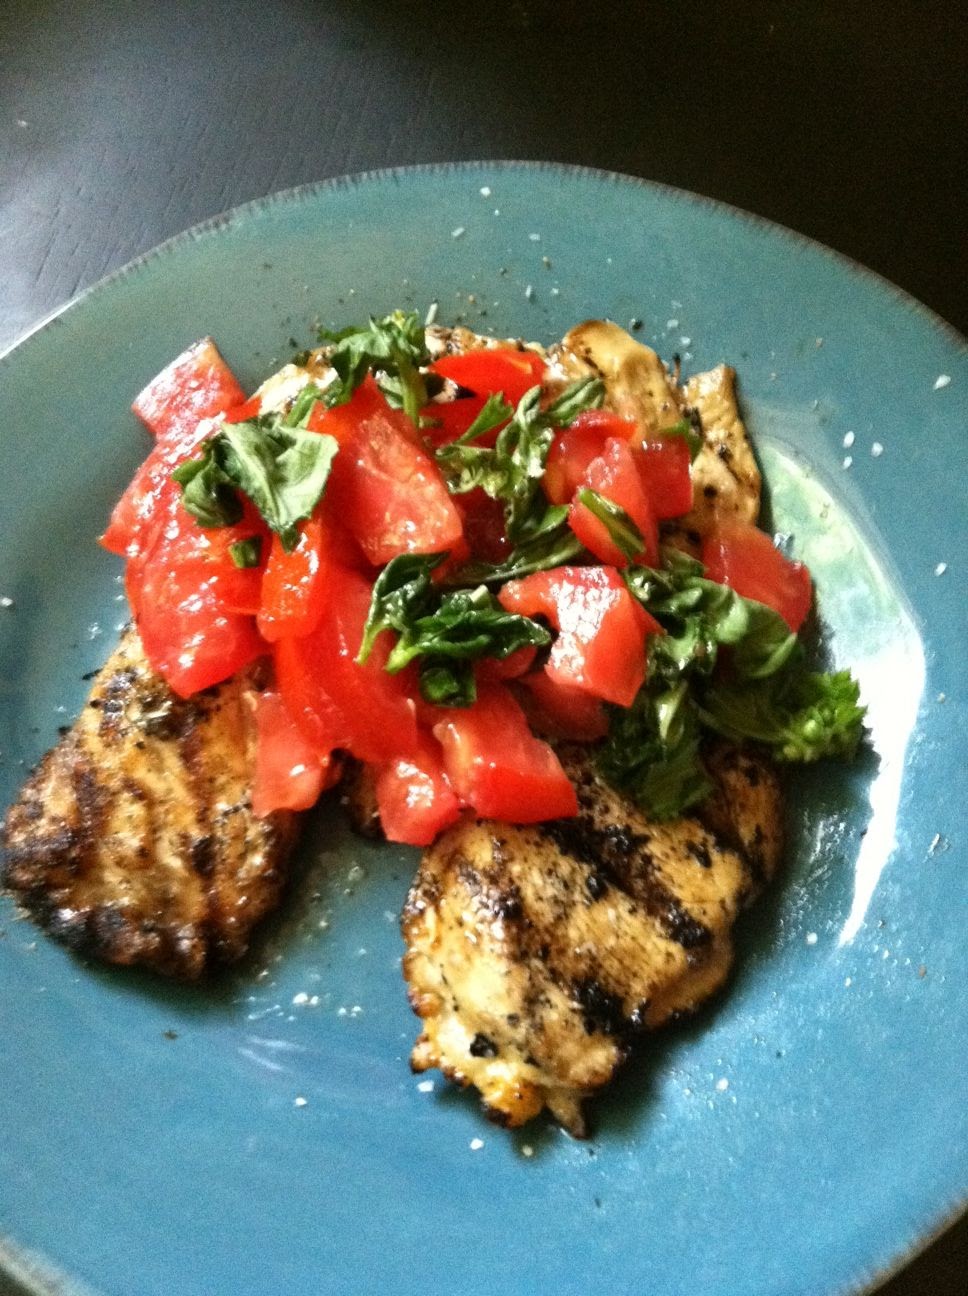
It only takes a minute or so to make a sauce/side/salad made of chopped fresh tomato, rough chopped basil, a drizzle of extra virgin olive oil, and a squeeze of lemon juice--to your taste.  And this garden-fresh blend tastes fabulous on the chicken.

You can also find lots of other garden-fresh sauce ideas--from Chimichurri to Romesco and more--in The Gardener and the Grill.
http://www.amazon.com/The-Gardener-Grill-Bounty-Garden/dp/0762441119/ref=sr_1_1?ie=UTF8&qid=1339619179&sr=8-1&keywords=the+gardener+and+the+grill


If you like, grill more paillards than you need for a meal. In other words, grill for leftovers. Let the extra paillard cool, then cover and refrigerate them for up to 2 days. Then, just eat the paillard cold from the refrigerator or reheat it in the microwave.

Bistro-Style Chicken on the Grill
Serves 4
4 boneless, skinless chicken breast halves, pounded to a 1/2-inch thickness
Olive oil
Fine kosher or sea salt and freshly ground black pepper to taste
1. Using a chef's knife, cut each boneless, skinless chicken breast in half lengthwise. Place each piece between plastic wrap or parchment paper. Using the flat end of a meat mallet or tenderizer, bang the chicken until it's 1/2-inch thick or less all over. Repeat with the remaining chicken until you have 8 thin paillards.
2. Brush each chicken paillard with olive oil and place on a double baking sheet (one sheet for the raw chicken, the clean one underneath for the grilled chicken). 
3. Start the charcoal in your charcoal chimney. When the charcoal has almost ashed over, dump the hot coals on one side your grill. Add a few sticks of hardwood from your yard, such as oak, maple, apple, peach, or hickory. 
4. Grill the paillards for 2 1/2 minutes per side, turning once. You can tell when to turn them when the perimeter of each paillard turns opaque and white. Season with salt and pepper and serve.


Farm Fresh Favorites


A picture's worth a thousand words.

dinner on the farm-table


I was struck by this photo, taken by LISA BRALTS-KELLY,  of the table set for a farm dinner at Prairie Fruits Farm & Creamery near Champaign/Urbana in Illinois.


And then I went to a real farm-to-table dinner at Green Dirt Farm near Weston, Missouri.
www.greendirtfarm.com/ 
Outdoors in the fresh air or in a barn, a farm dinner is one of those life-affirming experiences that everyone should be able to have. 
If you can't go to one in person, hosting one yourself--in your own "lower 40" backyard--is the next best thing.
For that, of course, you need real farm food from garden, orchard, pasture, creamery, and chicken coop.  
Set your table outside and serve up a few


Farm Dinner Favorites:
Garden Gimlet
The Beet Queen Salad with Smoked Goat Cheese
Tarragon Creamed Corn

First up is the Garden Gimlet. Every farm dinner needs a signature cocktail, and this one is refreshing, herb-scented, and oh-so-delicious. 


Garden Gimlet
From garden to glass, this deliciously refreshing drink is just the thing on a hot day.  In fact, it’s so good, the Garden Gimlet could well become your household’s signature drink. To be really authentic, use a Midwestern-distilled gin, such as Rehorst from Milwaukee, Wisconsin. Adapted from Heartland: The Cookbook http://www.amazon.com/Heartland-The-Cookbook-Judith-Fertig/dp/1449400574
Makes 4 drinks
Fresh Herb Syrup:
1 cup sugar
3/4 cup water
1/2 cup fresh, aromatic herb leaves, packed, coarsely chopped
¾ cup gin
½ cup fresh lime juice
8 fresh basil sprigs
1.  In a large, microwave-safe glass measuring cup, combine the sugar, water, and herbs. Microwave on high until the sugar dissolves, about 3 to 4 minutes. Let the mixture steep for 20 to 30 minutes. Then, strain the mixture into a bowl and let cool.  Use right away or store in a covered glass jar in the refrigerator for up to 2 weeks.
2. Combine the syrup, gin, and lime juice in a pitcher and stir well. Fill 4 highball glasses with ice and muddle each with a basil sprig.  Pour a fourth of the gimlet mixture into each glass.  Stir and serve, each drink garnished with a fresh basil sprig.


The Beet Queen Salad with Smoked Goat Cheese
This salad goes well with anything as far as I’m concerned, and could be a meatless entrĂ©e all on its own. Raw beets have a flavor similar to sweet corn and a texture like jicama, so prepare to be pleasantly surprised. I took a photo of my daughter Sarah, our family’s Beet Queen, holding our salute to this great salad.
Adapted from Heartland: The Cookbook
http://www.amazon.com/Heartland-The-Cookbook-Judith-Fertig/dp/1449400574
Varieties to try: Detroit Red and Ruby Queen, Chioggia (striped), and Burpee’s Golden
Serves 8
Orange Tarragon Vinaigrette
The juice of an orange
The zest of an orange
1 teaspoon Dijon mustard
1 garlic clove, minced
1 teaspoon tarragon vinegar
2 tablespoons fresh tarragon leaves
1/4 cup canola oil
1/2 teaspoon fine kosher or sea salt
6 to 8 cups greens
2 to 3 fresh peaches, peeled and sliced
1/2 cup crumbled Smoked Goat Cheese (page 000) or fresh goat cheese, crumbled
1 medium striped or Chioggia beet, peeled, trimmed, and julienned
1 medium golden beet, peeled, trimmed, and julienned
1 medium red beet, peeled, trimmed, and julienned
1. For the vinaigrette, whisk all ingredients together in a bowl.
2. To assemble the salad, arrange the greens and peach slices on a large platter or serving plate.
Crumble the goat cheese over the greens and peaches. Arrange a confetti of beets on top. Drizzle with the dressing and serve. 
To Smoke Goat Cheese--
Place a log of goat cheese in a disposable aluminum baking pan. Brush the cheese with olive oil.  Prepare a medium, indirect fire in your grill (heat on one side, no heat on the other). For a gas grill, wrap up 1 cup dry wood chips in aluminum foil and poke holes in the top. For a charcoal grill, scatter moistened wood chips on ashed over charcoal.  When you see the first wisp of smoke, place the pan of goat cheese on the indirect or no heat side, close the lid of the grill, and smoke for 30 minutes or until the cheese has a burnished appearance and a smoky aroma. Use right away or keep covered in the refrigerator for up to 1 week.


Tarragon Creamed Corn
Fresh sweet corn and garden-grown tarragon provide the flavors in this new take on a farmhouse classic. This is delicious with grilled, roasted, or fried chicken.
Varieties to try:  Heirloom Country Gentleman, Silver Queen, heirloom Boone County White, Butter and Sugar, or Peaches and Cream.
Serves 4
4 cups fresh or frozen sweet corn kernels
½ cup chopped green onions with some of the green
1 cup heavy cream
1 tablespoon tarragon vinegar
1 tablespoon fresh tarragon leaves
Kosher salt and freshly ground black pepper
Fresh tarragon sprigs to garnish
1. In a nonstick skillet over medium heat, stir the corn, green onion, tarragon, and cream together. Cook, stirring occasionally, until the corn is tender, about 5 minutes for fresh corn, 10 to 12 minutes for frozen.  Stir in the vinegar and cook for 2 more minutes. Season to taste and serve.