The Happiest Rainbow Cakes—Ever


Baking Spree! 
Day Three
There’s something about a rainbow cake that just makes you smile.


For me, every beautiful layer could tell its own unique story (minus the pain of overlooked toothpicks!).

The first rainbow cake I ever tasted was the signature dessert at Beth Barden’s Succotash in Kansas City, MO.

Then I saw one that two British women made for a special birthday.  The cake had so many differently colored layers (and candles) that they had to serve the cake on its side.


Just recently, Better Homes & Gardens featured a rainbow cake as a way to show off a cake stand.

There’s even a video to guide you through the basic process.


When I started experimenting with rainbow cake, I found that making individual, multi-layered rainbow cakes appealed to me.


Also, thinner rainbow cake layers taste best with a cream cheese frosting that is just a little tangy. Both the frosting and the cake come together better.

I found a large nonstick 6-cup muffin pan from R & M International Corp.
at a cake decorating shop.  The muffin cups measure 3-1/2 inches in diameter.

After the little cakes were baked, I cut each cake in half horizontally, then frosted three little layers together in varying combinations.


I call this photo "Sunlight on Rainbow Cakes." Hope they make you smile.


Rainbow Cakes
Cake flour and sour cream in the batter insure that your cake will be moist and tender, yet firm and sturdy—just what you want for a rainbow cake.  If you like, you could stir about ½ teaspoon flavoring in each tinted batter—lemon zest for yellow, orange zest for orange, lime zest for green, and so on.  

Makes 4 (3-1/2-inch) cakes to serve 8

1/2 pound (2 sticks) unsalted butter, softened
2 cups granulated sugar
2 large eggs, beaten
2 cups sifted cake flour
1 1/4 teaspoons baking powder
1/4 teaspoon salt
1 (8-ounce) container dairy sour cream
1 teaspoon vanilla extract
Food coloring
4 cups frosting of your choice tinted robin’s egg blue


1. Preheat the oven to 350 °F. Butter a 13-1/2 by 10-1/2-inch pan that makes 6 (3-1/2-inch diameter cakes and set aside. In a large bowl, with a hand-held electric mixer on low speed, cream the butter and granulated sugar. 


Beat in the eggs, sour cream, and vanilla. 


Then beat in the flour, baking powder, and salt for 1 minute, scraping down the sides of the bowl. Use a spatula to completely fold the dry ingredients into the batter until smooth and thick.  


2. Set out 5 small bowls.  In each small bowl, place ¾ to 1 cup of the batter and tint with food coloring to your desired color. (I used a toothpick inserted in a bottle of Americolor gel coloring, then dipped the toothpick into the batter.) Keep in mind that the color will somewhat darken during baking.


3. Fill each small cake cup with a tinted batter and smooth with a spatula or knife.


4. Bake for 25 to 28 minutes or until a toothpick inserted in the center comes out clean.  Let cool in the pan. 
5.  Invert the cakes onto a wire rack. 


Using a serrated knife, cut each cake in half horizontally. 


6. Using your prepared frosting, frost and stack three layers, securing the take with toothpicks if necessary. Frost the top and sides of each little rainbow cake. Repeat the process until you have four little three-layer cakes.


The Yum-miest Hot Cross Buns—Ever


Baking Spree! 
Day Two
‘Tis the season once again for this traditional springtime treat.
Hot cross buns—yeasty rolls flavored with spice and dried fruit and marked with a cross on top—have been so popular that we still sing about them in a nursery rhyme hundreds of years old.


“One ha-penny, two ha-penny, hot cross buns.”
Today, they’re mainly baked and eaten at Easter.
What’s new about this traditional bread is that it can now be made with a no-knead dough that lets extra liquid take the place of kneading. You can simply mix the dough together, let it rise, then roll out, cut, and form the dough into balls. When the buns have baked, you can paint on the distinctive cross with white icing, using a clean watercolor brush or a squeeze bottle.

No Knead?  No Worries!
The new trend in bread baking is the no-knead method, which is not new but has been revived now that instant or bread machine yeast is readily available. 
Instant yeast has a small granule that does not have to be “proofed” by sprinkling it over water first before mixing into a dough.  With instant or bread machine yeast, you simply stir the dry yeast into the flour.  By adding more liquid to a dough, you also eliminate the need to knead.  The extra liquid activates the gluten in the flour to do the kneading for you. If you like, you can use a utensil known as a Danish dough whisk to mix the dough easily, but you can also mix with a spoon.

A no-knead dough will be spongier-looking (as you can see below), looser to work with, and will not make precise shapes after it has risen. But once you've tried this dough, you'll be hooked on how simple it is to make.


Hot Cross Bun dough made with this no-knead method feels soft—like a baby’s skin—and is a pleasure to form. And the taste?  Yum!

Hot Cross Buns
Makes 14 to 16 hot cross buns
For the Dough:
1 tablespoon instant or bread machine yeast      
2 teaspoons fine kosher salt
3 1/2 cups all-purpose flour, plus more for dusting
1 tsp ground cinnamon
½ cup dried currants (or use small raisins or dried cranberries or cherries)
1 cup lukewarm milk, about 100°F
½ cup lukewarm water, about 100°F
1/2 cup granulated sugar   
2 tablespoons unsalted butter, melted     
1 large egg

For the Egg Wash:
1 large egg, beaten

For the Icing Paint:
1/2 cup confectioners’ sugar
½ teaspoon  vanilla extract
1 1/2 teaspoons milk

1. Measure. Spoon the flour into a measuring cup, level with a knife or your finger, then dump the flour into a large mixing bowl.
2. Mix. Add the yeast, salt, cinnamon, and currants to the flour. Stir together with a wooden spoon or Danish dough whisk. Combine the warm milk, water, sugar, and melted butter in a 4-cup measuring cup and stir to combine. Using a fork, beat the egg into the milk mixture. Pour the milk mixture into the flour mixture, stir to combine, then beat 40 strokes, scraping the bottom and the sides of the bowl, until the dough forms a lumpy, sticky mass.


3. Rise. Cover with plastic wrap and let rise at room temperature 72°F  for 2 hours or until the dough has risen about 2 inches under the rim of the bowl and has a sponge-like appearance.
4. Use Right Away or Refrigerate. Use that day or place the bowl, covered with plastic wrap, in the refrigerator for up to 3 days before baking.

 5. Form. To form rolls, transfer the dough to a floured surface and dust very lightly with flour. Flour your hands. Using a rolling pin, roll the dough into a 12 by 8-inch rectangle. If the dough begins to stick to the surface, use the dough scraper to push flour under the dough and scrape it up. Starting with a long end and using your hands, roll the dough into 12 to 14-inch cylinder. Pinch any seams together.  With the dough scraper, slice the cylinder into 1-inch pieces. Roll the pieces into balls.


6. Rest. Line a small cookie sheet with parchment paper. Place the balls, about 1 inch apart, [buns stay moister if they’re touching as they bake] on the prepared sheet.  Cover with a tea towel and let rest at room temperature for 1 hour.


7. Brush with Egg Wash. About 20 minutes before baking, preheat to 350°F. In a small bowl, beat the egg and brush the tops of the rolls with it.
8. Bake. Bake for 30 to 34 minutes or until the rolls have browned. Cool on a wire rack. Paint the rolls when cool.
9. Paint. For the paint, whisk the confectioners’ sugar, vanilla, and milk together in a bowl until smooth. Using a clean watercolor paint brush, paint a cross on each roll.


The Butter-iest Lemon Bars—Ever


Baking Spree! 
Day One
Hibernation can be good. 
It gives you time to step away from all the frazzle-dazzle and come back refreshed.
After working on a few great projects—like playing around with my new iphone—I have time to blog again.

I’ve missed all of you and I hope you’ve missed Alfresco!

And what better way to get our baking spree kicked off than with these easy, yummy, cookies that have a lot of good things going for them. Sweet, tart, buttery, and tender, these bars can be cut as large or as small as you wish.

Buttery Lemon Bars have a little magic, too. They seem to be able to banish any winter blahs or blahs in general. With a cup of tea or a shot of limoncello, you’re back in business.


Buttery Lemon Bars
With a shortbread cookie crust and a sweet/ tart lemon filling, these bars are addictive.  
Makes 3 dozen  
For the crust:
3 cups all-purpose flour
1/2 teaspoon salt
1 1/2 cups (3 sticks) unsalted butter, softened
3/4 cup confectioners’ sugar, plus more for dusting
For the filling:
3 large eggs
1 1/2 cups granulated sugar
3/4 teaspoon baking powder
1/4 teaspoon salt
1 1/2 tablespoons freshly grated lemon zest
3 tablespoons fresh lemon juice
1. Preheat the oven to 350 °F. Line a 9 by 13-inch pan with parchment paper and set aside.
2. For the crust, pulse the flour, salt, butter, and confectioner's sugar in a food processor, just until the dough holds together.  Press the dough onto the bottom and halfway up the sides the prepared pan. Bake the crust for 15 minutes until just set and slightly browned. Remove from the oven and set aside.
3. For the filling, combine the filling ingredients in a medium mixing bowl and beat for 3 minutes with an electric mixer. You want the mixture to be a lighter yellow, thicker than when you started, and with a froth of bubbles. Pour the filling over the hot crust.


4. Bake for 20 to 22 minutes more, or until firm in the middle and lightly browned on top. Cool completely, then dust with additional confectioner's sugar and cut into bars.


Unforgettable. And Still Unquenchable.


On Monday evening, my culinary book group met again.  These remarkable women make my heart glad.
We’ve seen each other through heartbreak and triumph, dishes that didn’t turn out, books we did and didn’t like, and new dishes we’ll definitely keep on making.
Each month the hostess chooses a culinary-themed book, usually a cookbook.  But we’ve read memoirs, biographies, novels, and even a food issue of a magazine. We all bring a dish from the book or inspired by the book.
First, we sipped wine and told the stories of our family Thanksgiving celebrations.  One intrepid friend fixed dinner—solo—for 37 people, 8 of which were children under the age of 12. Another “rested” by only having to make the turkey, dressing, mashed potatoes, and gravy. 
I recounted the tale of our Thanksgiving, when my sister and I deboned a 20-pound turkey using surgical scalpels—they work great, by the way.  We watched two YouTube videos first and then started on the big bird. We ended with a stuffed turkey roll wrapped in prosciutto (turkey porchetta) that kept growing and growing and growing as our Dad tied it up at intervals.  When it reached 3 feet—how could this be??—we looked at the recipe again. And saw that it only called for a 10-pound turkey.


The monster turkey roll wouldn’t fit in the oven, so we ended up cutting it. We grilled half and deep-fried half (after the other two turkeys came out of the outdoor fryer).
Unforgettable!
Now, back to book club.  For this month, we read Lunch in Paris: A Love Story with Recipes by Elizabeth Bard.
She had me at the first sentence: “I slept with my French husband halfway through our first date.” As an American who moved to Paris to be with her love, Bard recounts the little incremental steps by which she moves from being “that American” to being able to read in French and understand the not-so-secret disciplinary code that French women use to stay so thin (don’t eat much and drink a lot of water). 
A code my book club decided not to follow—at least for that night.
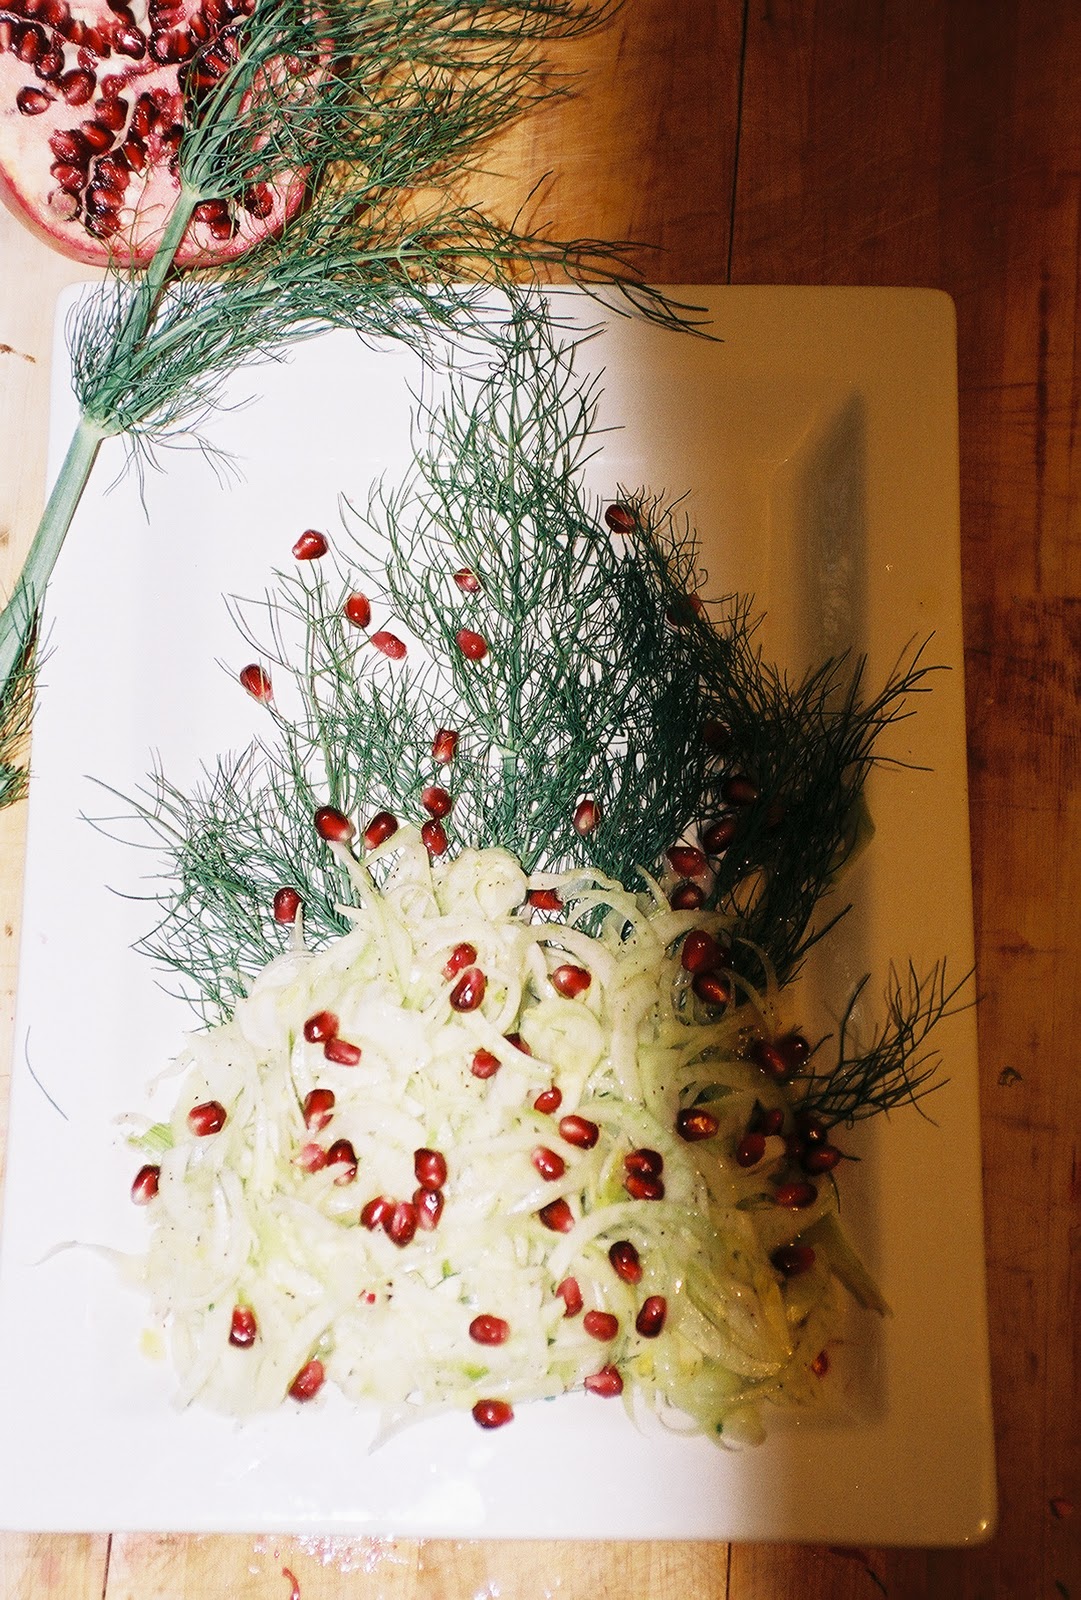
All of the recipes we tried were delicious. Right before I left the house, I snapped a quick photo of the dish I made, with a little holiday twist.


French Christmas Tree Salad
Adapted—with artistic license—from Lunch in Paris: A Love Story with Recipes by Elizabeth Bard.
This refreshing European vegetable salad uses few ingredients and is best made an hour or so before you serve it.  You can use a combination of fennel and fresh celery, if you like. Use a mandoline slicer or a very sharp chef’s knife to trim the root end of each fennel bulb, then trim off the shoots.  Save the feathery fronds to create a Christmas-tree effect on your serving platter. A very little bit of this salad makes a delicious contrast to heavier holiday foods.
To remove the seeds from a pomegranate, try Nigella Lawson’s method, which works great. Cut the pomegranate in half, fill a bowl with water, then whack the skin side of the pomegranate half with a wooden spoon so the seeds fall out and get trapped in the water (instead of going all over your kitchen). Once the first seeds come out, you can pry the rest with your fingers.
Serves 6
2 fennel bulbs, ends and shoots trimmed, and sliced paper thin
The juice of ½ lemon
Extra virgin olive oil
Kosher or sea salt
Freshly ground pepper
½ cup fresh pomegranate seeds
1.  Combine the sliced fennel and lemon juice in a bowl. Toss to blend, then drizzle with olive oil and toss again. Salt and pepper to taste and toss a third time.
2. Arrange the fennel fronds on a white platter in a Christmas tree shape.  Mound the fennel at the base and scatter all with pomegranate seeds. Cover and chill until ready to serve.

Unquenchable.


I think my book club pick for 2012 is going to be Natalie Maclean’s Unquenchable: A Tipsy Quest for the World’s Best Bargain Wines.
I love the way she writes about wine in a knowledgeable, but adventurous and light-hearted style. “Behind every bottle is a person and a story,” she says.
After all, many wineries are family-run, and families, as I well know, can somehow create monster turkey rolls at Thanksgiving.
And she holds back on the winespeak. Not so much “aromatizing the esters” as “making great wines at reasonable prices.”
Even her Unquenchable book trailer is fun to watch.

www.nataliemaclean.com/book

This book, with a bottle or two of her affordable wine picks, would be a great holiday gift.
P.S. Like Natalie, my sister also has a goat story. . . . but that’s for another blog.
Cheers!


The 12 Days of Cookbooks

and Italian Fig Cookies

How do you celebrate 12 Days of Cookbooks
Deliciously!
Let's start with Day One:
“On the first day of cookbooks, my true love gave to me—a charming prairie story—
Heartland: The Cookbook.”
 

For the past 12 days, we’ve also been celebrating 
Two chefs in love--Colby and Megan Garrelts of the acclaimed Bluestem, 

three French gems, four pasta chefs, five chocolate bonbons, six gamers gaming, seven foodies shopping, eight  bakers baking  (including my Artisan Bread Machine


and 
200 Fast & Easy Artisan Breads),

ten comfort classics, eleven cupcakes twirling, and twelve grillers grilling.
You can check out all the days for yourself, and put a few books (as well as Foodie Fight, Food Fight Rematch, and Wine Wars trivia games) on your gift list.

Now, it’s time for holiday baking. 
Nothing gets me more in the spirit than when my house is redolent of sugar and spice, orange and cranberry, fig and toasted pecan—all blended with the clean scent of fresh greenery.

When I think of cookies, I think of the Missouri Baking Company on “The Hill” in St. Louis, Missouri. This Italian bakery is in a little village-like district that reminds me of the movie “Moonstruck.” Mom-and-pop delis, old-style Italian restaurants, shotgun-style houses with tiny front gardens. The bakery is no-frills, family-owned, all scrumptious.
  
The Missouri Baking Company doesn't even have a web site.  They do business the old-fashioned way, in person or by phone. (314) 773-4122.

The last time I visited, I bought two boxes of Italian cookies.  When I put them down on a painted, peeling stoop, the photo looked just right--lots of great texture and taste.


This second box features Italian Fig Cookies—a tender dough that encloses a spiced fig filling, and is then drizzled with icing and dotted with colored sprinkles.  Just looking at them makes you smile.


You can also find Italian Fig Cookies, sometimes cut into different shapes and sometimes only during the holiday season, at other Midwestern bakeries, too:

Palermo Bakery in Chicago http://www.palermobakerychicago.com/
Rito’s Bakery in Parma, Ohio http://www.ritosbakery.com/
or
Bommarito Bakery in metro Detroit, Michigan. http://bommaritobakery.com/

If you make Italian Fig Cookies yourself, however, you don’t have to travel and you can have them any time!

You can make them in stages—the filling a week or two in advance, the cookie pastry a few days ahead. Then roll, fill, bake, drizzle, and sprinkle.


Italian Fig Cookies
Adapted from Heartland: The Cookbook.
The recipe for cuccidatti, or Italian fig cookies, was one Sicilian immigrants clutched tightly to their collective bosoms on the proverbial boat. No matter that fig trees struggle in the Midwestern climate—even as far south as Missouri, fig trees must be bundled up like toddlers in snowsuits to survive the seesaw extremes of winter weather—families of Sicilian origin want their fig cookies. One bite and you’ll see why. Make the filling a week or so in advance, if you wish, and keep it covered in the refrigerator until you’re ready to bake. If you end up with extra filling, use it to stuff and bake apples.
Makes 4 dozen cookies
Filling:
1 cup dried figs, about 4 ounces
1/3 cup dried dates, pitted
1/3 cup dark raisins
1 tangerine or Satsuma, peeled, seeded, and sectioned (most membrane removed)
1/2 teaspoon freshly grated nutmeg
1/2 teaspoon ground cinnamon
2 teaspoons freshly grated orange zest
¼ teaspoon fine kosher or sea salt
1/8 teaspoon ground black pepper
1 tablespoon light corn syrup
1 tablespoon grappa, bourbon, or cognac, optional
Pastry:
2 3/4 cups all-purpose flour, plus more for dusting
1 tablespoon baking powder
½ teaspoon fine kosher or sea salt
½ cup granulated sugar
1 cup (2 sticks) unsalted butter, chilled and cut into pieces
2 large eggs, beaten
2 tablespoons milk
2 teaspoons vanilla extract
Glaze:
¼ cup milk
1 teaspoon vanilla extract
1 1/2 cups confectioners’ sugar
1.  To make the filling, pour boiling water over the dried fruit and let steep for 15 minutes, or until softened.  Pour off the water.  Grind the figs, dates, raisins, tangerine sections, nutmeg, cinnamon, orange zest, salt, pepper, corn syrup, and optional grappa together in a food processor or in a food grinder until you have a moist paste.  Cover and refrigerate for up to 2 weeks before baking.
2.  To make the pastry, sift the flour, baking powder, salt, and sugar together in a food processor.  Add the butter and pulse until the mixture resembles small peas.  In a separate bowl, mix the eggs, milk, and vanilla together.  Add this mixture to the flour mixture and pulse to form a mass.  You will see small flecks of butter in the dough.
3.  Preheat the oven to 400°F. Line 2 baking sheets with parchment paper and set aside. 
4. Divide the dough into fourths. On a floured surface, roll each portion of dough into a 14- by 5-inch rectangle.  Spoon or pipe a fourth of the filling down the center of the pastry strip.  Turn so that the cylinder is horizontal to you. Bring the edges of the dough up and pinch them together with your fingers.  Remove any excess flour with a pastry brush. Roll the strip gently to form a cylinder, then gently squeeze and stretch the cylinder to a length of 18 inches.  Cut the cylinder into 1 1/2-inch pieces. Place on a baking sheet, seam side down, about 1 inch apart.  Repeat the process with the remaining pastry and filling.
5. Bake for 14 to 16 minutes or until lightly browned. 
6. For the glaze, whisk the milk, vanilla, and confectioners’ sugar together in a bowl. Brush the cookies with the glaze and sprinkle with colored sprinkles while still warm. Cookies will keep for up to 1 month in an airtight container.